
Desserts
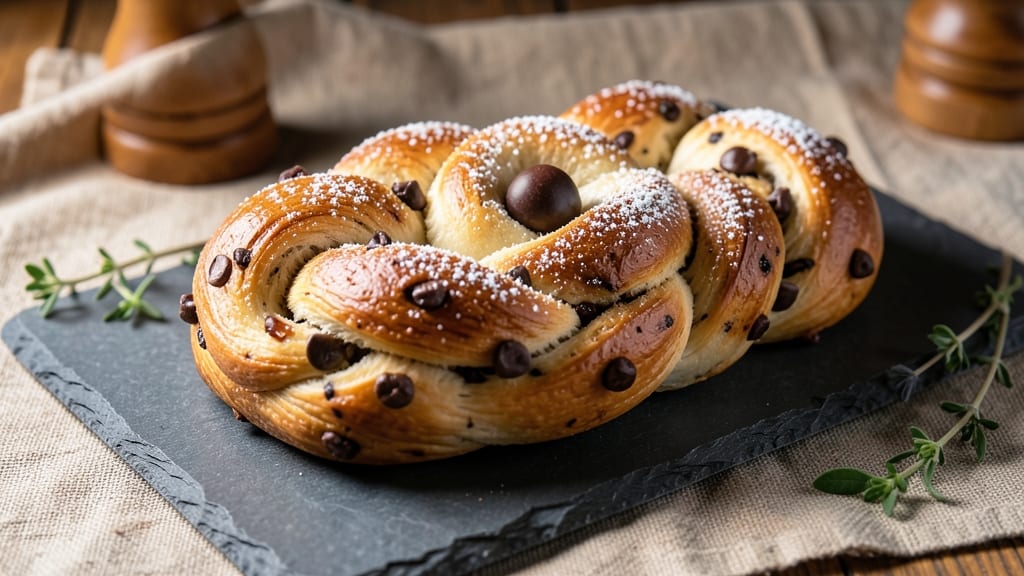
This braided chocolate chip brioche recipe delivers the perfect marriage of flaky, buttery layers and gooey chocolate chip pockets in every bite. 💛 The secret lies in a rich, slightly sweet brioche dough infused with cold butter—it creates those signature tender, airy layers while keeping the chocolate chips perfectly melty.
I’ve perfected the braiding technique over years of baking, ensuring the loaf rises evenly and develops a golden, crackly crust that’s impossible to resist.
The process starts with a foolproof brioche dough that requires patience but rewards with restaurant-quality results. You’ll work with yeast, eggs, and plenty of butter (because we’re not compromising on richness), then fold in chocolate chips for bursts of sweetness.
The braiding itself is simpler than it looks—think of it as a French-style loaf with a decorative twist, but don’t worry if your first attempt isn’t perfect. Even slight imperfections add character.
Baking at 350°F for about 30 minutes yields a loaf with a caramelized exterior and a soft, pillowy interior. The chocolate chips stay warm and melty, oozing out with every slice. This isn’t just dessert—it’s an experience, perfect for impressing guests or treating yourself after a long week.
The aroma alone will have everyone gathering in the kitchen, anticipation building with every golden-brown minute.
Once you’ve mastered the braid, you’ll want to experiment with variations—add sea salt for a sweet-salty contrast, swap chocolate chips for caramelized pecans, or even drizzle with a vanilla glaze. But first, let’s get that perfect loaf in the oven. The results will make every effort worth it.
Ingredients for braided chocolate chip brioche
Buttery dough, melty chocolate, and a braided masterpiece—just 12 ingredients for restaurant-quality brioche.
| Ingredient | Amount | Notes |
|---|---|---|
| Active Dry Yeast 🍞 | ¼ oz | 1 packet or 2¼ tsp |
| Granulated Sugar 🍬 | ¼ cup | For yeast activation |
| Whole Milk 🥛 | 1 cup | Warmed to 110°F |
| Large Eggs 🥚 | 4 whole | Room temperature |
| Unsalted Butter 🧈 | 1 cup | Cold, cubed |
| All-Purpose Flour 🌾 | 4 cups | King Arthur preferred |
| Salt 🧂 | ½ tsp | Diamond Crystal kosher |
| Semisweet Chocolate Chips 🍫 | 1 ½ cups | Enjoy Life brand for allergies |
| Vanilla Extract 🌿 | 1 tsp | Pure Madagascar bourbon |
| Flaky Sea Salt 🧂 | ¼ tsp | For sprinkling |
| Cornstarch 🌾 | 1 tbsp | For dusting |
| Egg Wash 🥚 | 1 whole | 1 egg beaten with 1 tbsp milk |
The butter is non-negotiable here—European-style butter like Plugrá has the highest fat content for that signature flakiness. Grab it from Whole Foods or specialty grocers if your regular store doesn't carry it. For the yeast, Fresh yeast from the refrigerated section works better than dry if you're feeling fancy, but active dry yeast is foolproof. The chocolate chips? Enjoy Life brand is my go-to for allergy-friendly baking, but Ghirardelli melts beautifully too. Pro tip: measure your flour by weight if you have a kitchen scale—4 cups equals about 500g—for consistency every time.
No vanilla extract? Vanilla bean paste works too, though it's pricier. Short on chocolate chips? Chopped dark chocolate bars in their place—just chop them into even pieces. The milk must be warmed to 110°F to activate the yeast properly—microwave it in 30-second bursts until just warm to the touch. For the butter, cold cubes (not softened) create those signature layers. If you're braiding for a crowd, double the recipe—just remember to increase your oven space accordingly. The eggs should be at room temperature to blend smoothly into the dough.
This dough is a beast—it needs 4-6 hours to rise properly at room temperature, so plan ahead. Store any unused dough wrapped tightly in plastic in the fridge for up to 3 days, or freeze for 3 months. The baked loaf keeps beautifully at room temperature for 2 days, wrapped in a cool, dry place. For reheating, wrap slices in a damp paper towel and microwave for 10-15 seconds—they'll taste like they just came out of the oven. The braided shape? It's purely decorative—even a simple round loaf will taste incredible if the dough is right.
Why You'll Love This Recipe
- No-Knead Magic: I swear by this dough’s lazy charm—just mix, let it rise, then braid. The yeast does all the work while you sip coffee or scroll through your phone. No stand mixer? No problem. A wooden spoon and a bowl work just fine.
- Rich & Buttery Payoff: That first bite—warm, flaky layers with gooey chocolate chips melting into the tender brioche? It’s like a hug from a French patisserie. The whole milk and eggs make it impossibly tender, while the butter (don’t skimp!) gives it that buttery, almost decadent crunch.
- Breakfast or Dessert: Honestly, I make this for both. Toast a slice for breakfast with peanut butter—game over. Or serve it warm with vanilla ice cream for dessert. It’s the kind of thing that works at brunch, as a midnight snack, or packed in a lunchbox for the kids (they’ll eat it faster than you can say “no sugar”).
- Leftovers That Beg for More: Between us, this recipe makes enough for seconds—or thirds. The brioche keeps well for days, and reheating it in the oven (or even the microwave) brings it back to life. Plus, the butter and eggs stretch your grocery budget without sacrificing flavor. My freezer’s always stocked with a backup loaf.
Step-by-step instructions for braided chocolate chip brioche
Here's how to create those irresistible flaky layers and rich chocolate melts—every bite will be worth the effort!
🍳 Step 1: Activate the Yeast and Mix the Dough Base
In a small bowl, combine the 1 cup warm whole milk (110°F) with the 0.25 cup granulated sugar and 0.25 oz active dry yeast. Let it sit for 5-10 minutes until frothy—this tells you your yeast is alive and ready to work. If it doesn't bubble, start over with fresh yeast.
In a stand mixer fitted with the dough hook, combine the 4 cups all-purpose flour, 0.5 tsp salt, and 1 tsp vanilla extract. Mix on low speed for 30 seconds to distribute the flour evenly. Add the yeast mixture and mix until combined, scraping down the sides as needed. The dough will look shaggy but that's okay—it'll come together.
👨🍳 Step 2: Incorporate Butter and Eggs for Richness
Add the 1 cup cold cubed unsalted butter and 4 room-temperature large eggs to the mixer. Mix on medium speed for 8-10 minutes until the dough becomes smooth and elastic. You'll see it pull away from the sides of the bowl and form a cohesive mass. If it's still sticky, add 1 tablespoon cornstarch to help absorb excess moisture.
Here's the thing—cold butter creates those signature flaky layers. Don't rush this step or the butter won't incorporate properly, which means you'll lose that melt-in-your-mouth texture we're after.
🥘 Step 3: Knead and First Rise for Maximum Flakiness
Transfer the dough to a lightly floured surface and knead gently for 2-3 minutes until smooth. Place it back in the mixer bowl, cover with a damp towel, and let it rise in a warm place for 1-1.5 hours or until doubled in size. The dough should spring back slowly when poked—this means it's ready for shaping.
I know it's tempting to rush this rise, but patience pays off. A proper rise develops the gluten structure that gives brioche its signature tender yet chewy texture. If your kitchen is cold, place the bowl near a warm oven with the light on to maintain consistent warmth.
🔪 Step 4: Shape and Braid the Dough
Once risen, punch down the dough and divide it into three equal pieces. Roll each piece into a 12-inch log about 1-inch thick. Arrange them parallel to each other and gently braid them together. Place the braid on a parchment-lined baking sheet and cover with a damp towel for 30 minutes to rise again until puffy.
This is where the magic happens—those braided strands create the beautiful presentation AND help distribute the chocolate chips evenly. Don't skip the second rise or your brioche will be dense. The dough should look full and slightly domed when ready.
🔥 Step 5: Bake to Golden Perfection
Preheat your oven to 350°F. Brush the braided dough with the 1 whole egg wash (1 egg beaten with 1 tablespoon milk) and sprinkle generously with 1.5 cups semisweet chocolate chips and 0.25 tsp flaky sea salt. Bake for 30-35 minutes until the brioche is deep golden brown and internal temperature reaches 190°F.
Here's the critical part: the moment you take it out of the oven, the chocolate chips should look glossy and slightly melted. If the top browns too quickly, tent with foil after 20 minutes to prevent over-browning. Let it cool on a wire rack for 10 minutes before slicing—this resting time ensures clean cuts and maximum gooeyness.
Pro Tips For Making Braided Chocolate Chip Brioche
- Bloom Yeast in Warm Milk: DESCRIPTION:
- Knead Until Windowpane: DESCRIPTION:
- Chill Dough Twice: DESCRIPTION:
- Cut Butter Last: DESCRIPTION:
Common mistakes when making this dish
Over-Kneading the Dough
Brioche dough is delicate—over-kneading develops too much gluten, making it tough instead of tender. Once the butter incorporates and the dough becomes smooth (around 8-10 minutes in the mixer), stop immediately.
I’ve seen home bakers knead for 15+ minutes thinking it’s necessary, but brioche needs just enough structure to hold its shape, not a bread-like tightness. If your dough resists pulling away from the bowl after 10 minutes, it’s ready. 💫
Skipping the Cold Butter
Cold butter is non-negotiable for those signature flaky layers. If you use softened butter, the fat melts too quickly during baking, creating dense pockets instead of airy ones. Keep your butter in cold cubes (not softened pats) and add it gradually to the mixer.
I’ve ruined brioche by rushing this step—trust me, the wait is worth it for that melt-in-your-mouth texture. ❄️
Under-Rising the Dough
Rushing the 1-1.5 hour rise is a common mistake. Brioche needs time to develop its airy texture, and skipping this step results in dense, heavy loaves. Test readiness by poking the dough—it should spring back slowly (not immediately).
If your kitchen is chilly, place the bowl near a warm oven with the light on to maintain 75-80°F. Patience here makes all the difference. ⏳
Uneven Chocolate Chip Distribution
Sprinkling chocolate chips randomly leads to clumps and uneven melting. Instead, gently press them into the dough before the final rise so they’re evenly distributed. For extra meltiness, use Enjoy Life brand chips—they’re designed to stay gooey longer.
I’ve seen bakers dump chips on top after baking, but they’ll stay hard and dry. Press them in during the 30-minute final rise for perfect pockets. 🍫
Baking at the Wrong Temperature
Baking brioche at 375°F instead of 350°F causes over-browning before the interior cooks through, leading to dry, tough crusts. Use an oven thermometer to confirm accuracy—many home ovens run 25°F hotter than set.
If the top browns too quickly, tent with foil after 20 minutes. The goal is a golden-brown exterior with a soft, warm center. 🌡️
Cutting Too Soon After Baking
Slicing brioche immediately after baking collapses the structure and releases steam too quickly, making it gummy. Always let it cool on a wire rack for 10-15 minutes to set the gluten.
This resting time also lets the chocolate chips firm up slightly for cleaner slices. I’ve ruined perfectly baked loaves by slicing too early—trust the process! ⏰
Nutrition facts
Frequently asked questions
Can I make this brioche without a stand mixer?
Yes! While a stand mixer makes kneading easier, you can absolutely do it by hand. After mixing the wet and dry ingredients, turn the dough out onto a lightly floured surface and knead for 10-12 minutes until smooth and elastic. Work in short bursts, resting your hands occasionally—this dough is rich and can be sticky. Just be patient, and you'll get the same flaky, buttery results.
How do I store leftover brioche?
Wrap the cooled loaf tightly in plastic wrap or place it in an airtight container to keep it fresh for 2-3 days at room temperature. For longer storage, freeze slices wrapped in parchment paper for up to 3 months. To reheat, wrap slices in a damp paper towel and microwave for 10-15 seconds—they'll taste warm and gooey again!
Can I substitute white chocolate chips for semisweet?
White chocolate chips work beautifully and add a creamy, milder sweetness. For best results, use the same amount (1.5 cups) and press them into the dough during the final rise. White chocolate melts more smoothly and pairs wonderfully with the rich brioche. Just avoid baking at high heat, as white chocolate can scorch more easily.
Why did my braided brioche fall apart when slicing?
This usually happens when the dough hasn't rested long enough after baking. Brioche needs 10-15 minutes to cool and set its structure before slicing. If it's still warm, the gluten is too soft and the layers will collapse. For cleaner cuts, let it cool completely on a wire rack—patience here makes all the difference!
What’s the best way to braid the dough for beginners?
Start by dividing the dough into three equal pieces and rolling each into a 12-inch log. Place them side by side, then lift the middle log over the left, tuck it under, and bring it over the right. Repeat this motion, alternating sides, until the braid is complete. If it looks uneven, don’t stress—even a slightly messy braid will taste amazing! The key is to keep the tension even as you work.