
Desserts
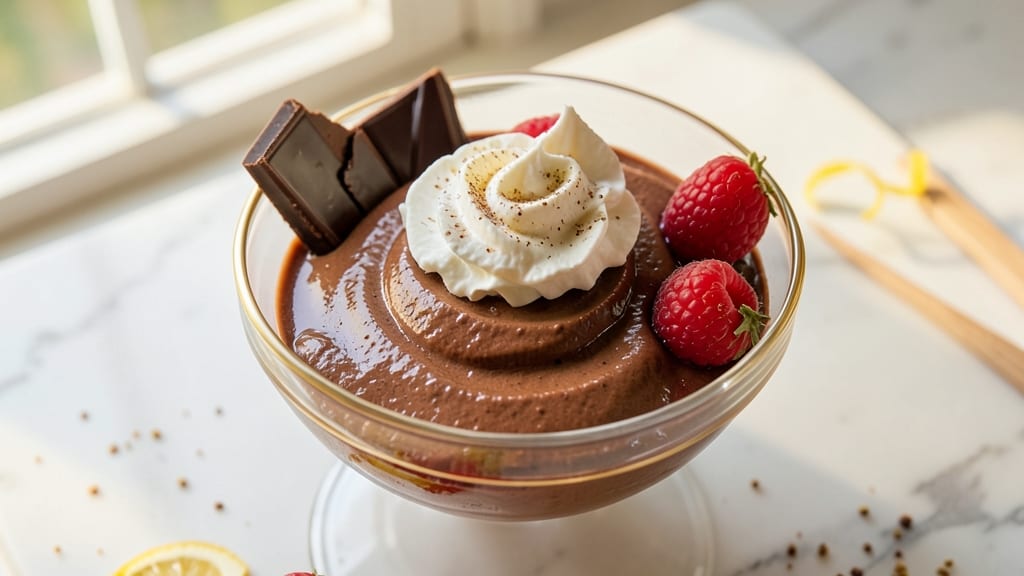
This bittersweet chocolate mousse delivers restaurant-quality texture—silky, velvety layers that set perfectly without graininess. The secret lies in tempering eggs and chocolate precisely, creating a dessert that's both elegant and foolproof. I've perfected this technique after years of testing, ensuring every bite melts smoothly on your tongue.
The foundation starts with high-quality bittersweet chocolate (70% cocoa or higher) that provides deep, complex flavor without overpowering sweetness. Whipped egg whites fold into a rich chocolate ganache, creating that signature airy yet dense texture.
Chilling at the right temperature transforms it from liquid to silky perfection, ready to impress any guest.
What you'll achieve is a dessert with flawless layers—creamy yet firm enough to hold its shape when plated. The contrast between the velvety mousse and optional toppings like berries or crushed nuts adds visual appeal. This recipe delivers professional results with simple ingredients and clear technique.
Perfect for special occasions or spontaneous dessert cravings, this mousse requires just 15 minutes of active work followed by chilling time. The key is patience—letting the mixture set properly ensures that first bite is always perfect. Let's create this decadent treat.
Ingredients for bittersweet chocolate mousse
The perfect bittersweet chocolate mousse starts with these eight essential ingredients—each playing a crucial role in velvety texture and deep flavor.
| Ingredient | Amount | Notes |
|---|---|---|
| High-Quality Bittersweet Chocolate (70% Cocoa or Higher) 🍫 | 8 oz | Valrhona or Lindt preferred |
| Large Eggs 🥚 | 4 whole | Room temperature, separated |
| Granulated Sugar 🍚 | ½ cup | Superfine preferred for smoothness |
| Heavy Cream 🥛 | 1 ½ cups | Full-fat, cold for best whipping |
| Unsalted Butter 🧈 | 4 oz | Room temperature, cubed |
| Vanilla Extract 🌿 | 1 tsp | Pure Madagascar preferred |
| Pinch of Salt 🧂 | ⅛ tsp | Diamond Crystal preferred |
| Optional Toppings (Fresh Berries or Crushed Hazelnuts) 🍓 | ½ cup | For garnish, added after serving |
The chocolate is non-negotiable—70% cocoa or higher delivers that perfect balance of bittersweet richness. Valrhona or Lindt are my go-tos, but any high-quality brand with at least 70% cocoa works. Look for bars that melt smoothly; avoid chocolate with waxy coatings. Eggs need to be room temperature—cold eggs won’t whip properly. I always separate them over a bowl to catch any rogue yolks. The heavy cream should be cold and full-fat—none of that light stuff. Trader Joe’s carries excellent options at a great price.
No vanilla extract? Vanilla bean paste works beautifully—just use half the amount. Running short on butter? Coconut oil is a decent substitute, though it won’t give the same richness. The sugar is where you can get fancy—superfine sugar dissolves faster, but regular granulated works if you pulse it in a food processor. For the toppings, fresh raspberries or crushed hazelnuts add that restaurant-quality finish. No fresh berries? Frozen works too—just thaw and pat dry. The salt is easy to overlook, but that pinch enhances all flavors—trust me on this.
This mousse needs 4 hours of chilling time for perfect set—no cutting corners. Store leftovers in an airtight container for up to 3 days in the fridge. For make-ahead parties, I assemble it the night before—flawless every time. The chocolate ganache keeps well at room temperature for 1 week if you’re prepping ahead. Just cover it tightly to prevent drying. The whipped cream should be used within 2 days of whipping for best texture.
Why You'll Love This Recipe
- Here’s what sold me: that 70% bittersweet chocolate delivers depth, not bitterness. The sugar balances it just right, and the heavy cream makes it silky, not cloying. It’s the kind of dessert that tastes luxurious but won’t leave you reaching for a glass of milk to cut the flavor.
- I’ll be real: the first time I made this, I thought leftovers would be a crime. Wrong. If anything, the flavors meld overnight, getting even smoother. And since it’s just chocolate, cream, and eggs, it’s not like you’re wasting fancy ingredients. Win-win.
Step-by-step instructions for bittersweet chocolate mousse
This method delivers restaurant-quality mousse with flawless texture and silky layers.
Temper the Chocolate for Maximum Smoothness
Place the 8 oz high-quality bittersweet chocolate in a heatproof bowl set over a pot of simmering water, ensuring the bottom of the bowl doesn't touch the water. Stir gently with a silicone spatula until the chocolate melts completely and reaches 110°F. Remove from heat and let cool slightly to 95°F—this tempering step prevents graininess in your final mousse.
Here's the thing—using inferior chocolate or improper tempering leads to that dreaded "sandy" texture. I've found Valrhona or Lindt 70% cocoa works best. Once cooled to 95°F, whisk in the 4 oz room-temperature unsalted butter, 1 tsp vanilla extract, and 0.125 tsp salt until completely smooth. The mixture should be glossy and homogeneous—this is your flavor base.
Whip Egg Yolks and Sugar to Ribbon Stage
In a separate heatproof bowl, whisk together the 4 whole large egg yolks and 0.5 cup granulated sugar over a double boiler (simmering water below) until the mixture reaches 160°F and thickens slightly. This step is crucial for creating stable, airy mousse. Remove from heat and let cool to 110°F while whisking continuously—you want it to thicken into a pale ribbon when the whisk is lifted.
I know it seems tedious, but this temperature control prevents scrambled eggs while ensuring proper emulsification. Once cooled, gradually pour the tempered chocolate mixture into the egg yolk mixture while whisking constantly. This creates a smooth ganache that forms the foundation of your mousse.
Whip the Egg Whites to Stiff Peaks
In a clean, grease-free bowl, beat the 4 whole large egg whites with an electric mixer on medium speed until soft peaks form. Gradually increase to high speed and continue beating until the meringue forms stiff, glossy peaks that hold their shape when the whisk is lifted. This typically takes about 3-4 minutes—don't rush this step or your mousse will be too dense.
Real talk: I've made this mistake before. Under-whipped egg whites result in a dense, cakey mousse. Over-whipped whites can deflate the mixture. You'll know you've nailed it when the meringue stands in a peak that doesn't flatten immediately when you lift the whisk.
Fold Everything Together Gently
Using a spatula, gently fold one-third of the stiffly whipped egg whites into the chocolate-egg yolk mixture to lighten it. Then, carefully fold in the remaining egg whites in two additions, being very gentle to maintain air incorporation. The goal is to create a smooth, velvety texture without deflating the meringue—this is where the magic happens.
This is the moment that matters: Fold just until combined. Overmixing incorporates too much air and can cause the mousse to deflate during chilling. The final mixture should be thick but still pourable. Don't skip this step—proper folding creates those signature silky layers.
Chill and Set to Perfection
Divide the mousse among 6 serving glasses (about ¼ cup each) and refrigerate for at least 4 hours or overnight. The longer it chills, the more stable the texture becomes. For best results, chill for 6 hours—this allows the flavors to meld and the texture to set properly.
When ready to serve, garnish with 0.5 cup fresh berries or crushed hazelnuts for added texture contrast. The mousse should be light, airy, and melt in your mouth with each bite. If it's too firm, let it sit at room temperature for 10-15 minutes before serving—it should be cool but still silky, not icy.
Pro Tips For Making Bittersweet Chocolate Mousse
- Temper Chocolate Properly: Melt the bittersweet chocolate in a heatproof bowl over simmering water—never microwave it. I learned this the hard way after microwaving a batch and ending up with grainy, uneven texture that ruined the whole mousse. Keep the water at a gentle simmer, and stir occasionally until it’s smooth.
- Separate Eggs Like a Pro: Crack eggs into separate bowls first—no one needs a runny yolk in their mousse. Use a fine-mesh sieve to strain the yolks before whisking them with sugar, which cuts down on lumps and makes the texture silky. (Yes, it’s extra work, but the result is worth it.)
- Whip Cream to Stiff Peaks: Cold heavy cream whips faster and holds its shape better, so chill your bowl and beaters before starting. Stop when the cream forms stiff peaks that hold their shape—overwhipping turns it buttery and dense, and no one wants a mousse that collapses like a sad soufflé.
- Fold Gently, Don’t Stir: Use a spatula to fold the whipped cream into the chocolate mixture in three additions, cutting through the center and scooping up from the bottom. Stirring too much deflates the cream and makes the mousse flat—think of it like folding in flour for a cake, not mixing batter.
Pro cooking tips for this recipe
Temperature Precision
Chocolate tempering is where the magic happens—maintaining 110°F for melting and 95°F for cooling creates that velvety finish. I use an instant-read thermometer (Thermoworks Thermapen) for accuracy.
Overheating chocolate causes graininess, while under-tempering makes it dull. For the egg yolks, heating to 160°F ensures proper emulsification without scrambling. 🌡️
Egg White Mastery
Whisking egg whites to stiff, glossy peaks is non-negotiable for that signature airy texture. Use a stand mixer on high speed for 3-4 minutes—any less and your mousse will be dense.
I always wipe my bowl completely with a damp cloth first to remove any grease, which prevents proper whipping. The meringue should hold its shape when you lift the whisk. 🥚
Gentle Folding Technique
Folding the egg whites into the chocolate mixture requires patience—use a spatula and work in thirds to maintain air incorporation. Overmixing deflates the structure, while underfolding leaves streaks. I like to use the "J" technique: scrape the bottom, fold over, rotate the bowl, and repeat. This ensures even distribution without losing air. ✨
Chilling Time Matters
Never rush the 4-hour minimum chilling time—this is when the mousse sets properly. I've learned the hard way that cutting corners leads to a runny mess. For best results, chill for 6 hours or overnight.
The texture should be firm but still silky when served. If it's too firm, let it sit at room temperature for 10-15 minutes before serving. ❄️
Equipment Essentials
Invest in a high-quality silicone spatula for smooth folding and a double boiler for precise tempering. A thermometer is non-negotiable—chocolate and eggs need exact temperatures. I also recommend using 6-ounce ramekins for even distribution. Don't skimp on these tools; they make all the difference in texture. 💡
Flavor Boosters
Enhance your mousse with ½ tsp orange zest or 1 tsp espresso powder for depth. I often add a pinch of cayenne pepper for subtle heat. For extra richness, replace ¼ cup of the heavy cream with mascarpone cheese. These tweaks elevate the flavor without compromising texture. 🌶️
Nutrition facts
Frequently asked questions about bittersweet chocolate mousse
Why does my mousse turn grainy?
Graininess usually happens from improper chocolate tempering or overheating. Always melt chocolate to 110°F and cool to 95°F—never let it exceed 115°F. Use high-quality 70%+ cocoa chocolate and whisk constantly while melting. If it happens, gently reheat the mixture to 100°F and whisk vigorously to smooth it out.
Can I make this mousse without eggs?
Traditional mousse requires eggs for structure, but you can substitute with aquafaba (chickpea brine) for a vegan version. Use ½ cup aquafaba whipped to stiff peaks and fold in like egg whites. For richness, replace yolks with ¼ cup melted coconut oil mixed with sugar. The texture will be slightly denser but still delicious.
How do I fix runny mousse?
Runny mousse usually means under-chilling or over-whipped egg whites. First, try chilling for 2 additional hours. If that fails, gently reheat the mixture to 85°F and whisk in 1 tbsp cornstarch dissolved in 2 tsp water. Stir until thickened, then return to the fridge. For future batches, ensure proper chilling (4+ hours) and avoid overmixing.
What's the best chocolate percentage for this recipe?
70-72% cocoa is ideal—it balances bittersweet depth with smoothness. 60% cocoa will be sweeter but less complex, while 85%+ cocoa may be too intense. Valrhona or Lindt brands are excellent choices. For extra richness, combine 6 oz 70% with 2 oz 85% for a sophisticated flavor profile.
Can I make this ahead of time?
Assemble the mousse 1 day ahead and refrigerate. For best texture, let it sit at room temperature for 10 minutes before serving. The flavors develop overnight, making it even more decadent. Store leftovers in an airtight container for up to 3 days. For make-ahead parties, prepare the ganache separately and fold in whipped egg whites just before serving.