
Desserts
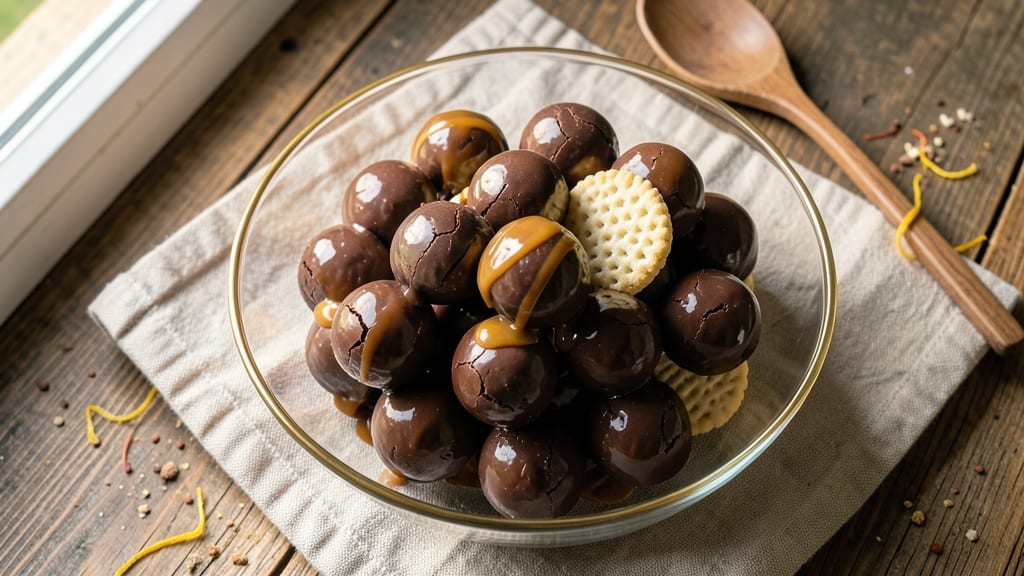
This caramel chocolate balls recipe delivers the perfect balance of rich chocolate and gooey caramel in every bite. The secret lies in creating a smooth, fudgy chocolate shell that encases a luscious caramel center—no baking required.
I developed this recipe after years of testing, ensuring the texture stays perfectly chewy on the outside while keeping that caramel surprise tender inside.
The process is surprisingly straightforward: melt chocolate and butter together, then mix in crushed cookies for structure. The caramel filling gets rolled into small balls before being dipped in the chocolate mixture and chilled until set.
With just a handful of ingredients, you'll create a dessert that's elegant enough for holidays but simple enough for weeknight treats.
What makes these chocolate balls truly special is the contrast of flavors and textures—each bite offers a burst of salty-sweet caramel followed by the deep richness of dark chocolate. The recipe yields about 24 perfect-sized balls, ideal for gift-giving or satisfying a sweet craving without the fuss of baking.
For added texture, try rolling the balls in crushed nuts or a sprinkle of flaky sea salt before chilling. These variations elevate the classic recipe while keeping the process equally simple. Let's get started on creating these irresistible treats!
Ingredients for caramel chocolate balls
Twelve essential ingredients crafting rich chocolate and gooey caramel surprises in every bite.
| Ingredient | Amount | Notes |
|---|---|---|
| Dark Chocolate Bars 🍫 | 12 oz | Semi-sweet or milk chocolate, chopped |
| Unsalted Butter 🧈 | ½ cup | Cut into small pieces |
| Vanilla Extract 🌿 | 1 tsp | Pure vanilla for flavor |
| Creamy Caramel Sauce 🍯 | 1 ½ cups | Store-bought or homemade |
| All-Purpose Flour 🌾 | ½ cup | For cookie structure |
| Vanilla Wafer Cookies 🍪 | 1 ½ cups | Crushed into fine crumbs |
| Salted Caramel Candy 🍬 | 1 ½ cups | Chopped into small pieces |
| Powdered Sugar 🍚 | ¼ cup | For dusting between layers |
| Flaky Sea Salt 🧂 | 1 tbsp | For garnish (optional) |
| Heavy Cream 🥛 | ¼ cup | For caramel filling (if homemade) |
| Granulated Sugar 🍚 | 1 cup | For homemade caramel |
| Pecans or Walnuts 🌰 | ½ cup | Chopped for texture variation |
The chocolate is non-negotiable—Ghirardelli or Lindt bars melt the smoothest, but any high-quality brand works. Butter matters here too: European-style gives a richer flavor. For the caramel, store-bought brands like Smucker's save time, but homemade (just sugar, cream, and butter) is worth the effort. The vanilla extract should be pure, not imitation—Bourbon or Madagascar varieties add depth. Buy vanilla wafers in bulk if you're making these often—they stay fresh for 3 months in an airtight container.
No vanilla wafers? Graham crackers or digestive biscuits work in a pinch, but they add a different texture. Short on caramel candy? Homemade caramel sauce (just sugar, cream, and butter) does the trick—simmer until golden, then cool. For the chocolate mixture, if you don't have powdered sugar, blend granulated sugar in a blender for a quick substitute. The chopped nuts can be skipped, but they add a delightful crunch—pecans or walnuts are classic, but almonds work too. Always use room-temperature chocolate for smooth melting.
Store the finished caramel balls in an airtight container between layers of parchment paper for up to 2 weeks at room temperature. For longer storage, freeze them for 3 months—just let them thaw at room temperature before serving. The chocolate shell softens slightly in heat, so keep them in a cool, dry place. These make perfect gifts—wrap individual balls in cellophane with a ribbon for a festive touch. Prep ahead by making the chocolate mixture and caramel filling separately, then assemble just before chilling.
Why You'll Love This Recipe
- No-Mess Mixing: I swear by this trick—just melt the butter and chocolate together, then fold in the flour and caramel like you’re making cookie dough. No food processor, no stress, just a bowl and a spatula. Honestly, the easiest part is rolling them into balls while they’re still warm.
- Salted Caramel Magic: That creamy caramel sauce isn’t just filling—it’s the star. The buttery richness of the chocolate meets the gooey sweetness, and the vanilla ties it all together. Between us, the first bite always makes me close my eyes.
- Party in a Jar: These disappear at gatherings—trust me, I’ve tested this. Keep them in an airtight container, and they stay fresh for days. Perfect for holiday gifts, potlucks, or when you need to impress without slaving away in the kitchen.
- Budget Sweet Tooth Fix: Dark chocolate and butter are pantry staples, and a little caramel sauce goes a long way. I’ve made these for under $5 and still felt like I was serving something fancy. Plus, the leftovers? They’re the best motivation to bake again.
Step-by-step instructions for caramel chocolate balls
Layering rich flavors and textures creates these decadent treats with perfect balance.
Melt Chocolate and Butter for the Shell
In a heatproof bowl set over a saucepan of simmering water, combine the 12 oz chopped dark chocolate bars and 0.5 cup unsalted butter. Stir gently until both are completely melted and smooth, forming a glossy chocolate mixture. Remove from heat and whisk in the 1 tsp vanilla extract until fully incorporated.
This double boiler method ensures even melting without scorching the chocolate. You'll know it's ready when the mixture reaches 110°F and has a satiny, pudding-like consistency. Let it cool slightly to 95°F before proceeding—this prevents the caramel filling from melting prematurely when combined.
Prepare the Crunchy Cookie Base
In a food processor, pulse the 1.5 cups vanilla wafer cookies until you achieve fine crumbs with no large pieces remaining. Transfer these to a mixing bowl and stir in the 0.5 cup chopped pecans or walnuts and 1.5 cups chopped salted caramel candy.
The texture here is critical—too fine and the balls will be dense, too coarse and they'll crumble. You want a sandy, even consistency that binds together when pressed. Set this mixture aside while you prepare the caramel filling.
Create the Caramel Filling
In a separate saucepan, combine the 1.5 cups creamy caramel sauce, 0.25 cup heavy cream, and 1 cup granulated sugar. Warm over medium heat, stirring constantly until the sugar dissolves completely and the mixture reaches 160°F. Remove from heat immediately to prevent overcooking.
This filling should be thick but pourable—like warm honey with a glossy sheen. If it's too thin, chill for 10 minutes to thicken slightly. The caramel will soften slightly when combined with the chocolate, creating that signature gooey surprise at the center.
Assemble and Shape the Balls
In a medium bowl, gently mix the cooled chocolate mixture with the cookie-caramel-nut base until just combined. The dough should hold together when pressed but remain soft enough to shape. If it's too dry, add 1-2 teaspoons of heavy cream to bind it.
Roll the mixture into 1-inch diameter balls, packing them firmly to ensure each contains a generous center of filling. Place them on a parchment-lined baking sheet and dust with 0.25 cup powdered sugar to prevent sticking. Chill in the refrigerator for 1 hour to set completely.
Garnish and Finish
Once fully chilled, transfer the balls to a serving platter and sprinkle with 1 tbsp flaky sea salt for a sophisticated finish. The salt enhances all the sweet flavors while adding a delightful contrast. Serve at room temperature for the perfect balance of fudgy exterior and creamy caramel surprise.
These treats keep well in an airtight container in the refrigerator for up to 1 week, though they rarely last that long. The contrast of textures—crunchy cookie base, creamy caramel center, and smooth chocolate shell—makes each bite unforgettable.
Pro Tips For Making Caramel Chocolate Balls
- Melt Chocolate Slowly: I learned this the hard way—throwing chopped chocolate into hot butter is a recipe for streaks and lumps. Instead, melt the butter first (just until it stops wiggling), then lower the heat to low and add the chocolate in small chunks, stirring constantly. The goal is a silky, glossy mixture, not a science experiment.
- Chill the Dough Properly: This isn’t the prettiest method, but it’s the tastiest: roll the dough into balls before chilling, then pop them in the freezer for 15 minutes. The cold hardens the exterior just enough to prevent them from flattening when you dip them in caramel. (Yes, even if you’re impatient like me.)
- Use Store-Bought Caramel: I skip making homemade caramel—it’s a sticky, high-maintenance mess that rarely turns out right. Grab a high-quality store-bought creamy caramel sauce (like the kind in a squeeze bottle) and reheat it gently in a double boiler. It’ll coat the chocolate balls evenly without the risk of burning or clumping.
- Dip Quickly, Shape Fast: The moment you dip a ball in caramel, set it on parchment paper and roll it immediately in flour. If you linger, the caramel will pool at the bottom, making lopsided, messy balls. Work in batches—two or three at a time—so you’re not juggling warm dough and cold caramel. Your future self will thank you.
Make-ahead tips for this recipe
Prep Ahead Strategy
Divide the process into two stages to save time: Make the chocolate mixture and caramel filling separately, then assemble when ready. The chocolate base can be refrigerated in an airtight container for up to 3 days—just re-melt gently before using.
For the caramel filling, store it in a sealed jar in the fridge for 5 days, or freeze for 2 months. 🥫
Chilling Efficiency
Use silicone mini muffin molds (6-8 per tray) instead of a baking sheet for faster chilling. Place trays in the freezer for 20 minutes before transferring to the fridge—this cuts the 1-hour chill time by half.
Line molds with parchment circles for easy removal. For large batches, work in two batches to avoid overcrowding.
Storage Hacks
Store finished balls in single layers between parchment paper in a vacuum-sealed bag to prevent sogginess. They’ll last 2 weeks at room temperature or 3 months in the freezer. To reheat from frozen, let sit at room temp for 15 minutes—no microwave needed.
For gift-giving, wrap individual balls in cellophane cones with a ribbon for a bakery-style presentation. 🎁
Freezer-Friendly Assembly
Roll the balls slightly under-sized (about ¾ inch) before freezing—they’ll expand slightly. Place them on a tray, freeze solid for 1 hour, then transfer to a freezer bag.
When ready to serve, let thaw for 10 minutes before enjoying. This method preserves the crisp chocolate shell better than refrigerated storage.
Make-Ahead Garnishes
Prep garnishes separately to keep them fresh. Toast pecans or walnuts in a dry pan for 3 minutes and store in an airtight container for up to 1 week. Flaky sea salt loses its texture over time, so sprinkle it fresh before serving.
For extra flair, melt white chocolate and drizzle over chilled balls just before serving—it sets quickly and adds a glossy finish. ✨
Batch Cooking Tips
Double the recipe for 48 balls—the process scales perfectly. Use a stand mixer with the paddle attachment to combine the chocolate and cookie mixture for large batches. Label containers clearly with dates, as the texture of the chocolate mixture changes over time.
For holiday prep, assemble all components 2 days ahead, then finish rolling and chilling the day before serving. 📅
Nutrition facts
Frequently asked questions
Can I use milk chocolate instead of dark chocolate?
Yes, but the flavor will be sweeter and less intense. Dark chocolate (at least 50% cocoa) provides the best balance of richness and bitterness that complements the caramel. If you prefer milk chocolate, reduce the butter by 1 tablespoon since milk chocolate already contains milk fat. The texture will be slightly softer but still delicious!
Why did my caramel chocolate balls turn out crumbly?
Crumbly texture usually means the cookie base was too dry or the chocolate mixture cooled too much before shaping. Make sure your chocolate stays between 95°F-100°F when mixing with the cookie crumbs. If the dough feels too dry, add 1 teaspoon of heavy cream at a time until it holds together when pressed. Chill the balls for the full 1 hour to prevent cracking.
How do I make these without vanilla wafers?
You can substitute with graham crackers or digestive biscuits for a similar texture. For extra flavor, crush 1-2 squares of white chocolate into the cookie mixture. Just be aware that graham crackers add a molasses note while vanilla wafers provide a neutral, buttery base. The key is to pulse them into fine crumbs—no larger than 1/8 inch pieces.
Can I make these gluten-free?
Replace the vanilla wafers with gluten-free shortbread cookies or gluten-free graham crackers. For the flour in the chocolate mixture, use gluten-free all-purpose flour blend. The recipe works perfectly with these substitutions—just ensure your cookie crumbs are finely ground. The texture will be slightly more delicate but still hold together when chilled properly.
What's the best way to store them for gifting?
For gift-giving, place the finished balls in a single layer between parchment paper in an airtight container. Store at room temperature for up to 1 week or freeze for 3 months. For presentation, wrap individual balls in cellophane cones with a satin ribbon. Add a handwritten tag with serving instructions—like "Best enjoyed at room temperature"—to elevate the gift!