
Desserts
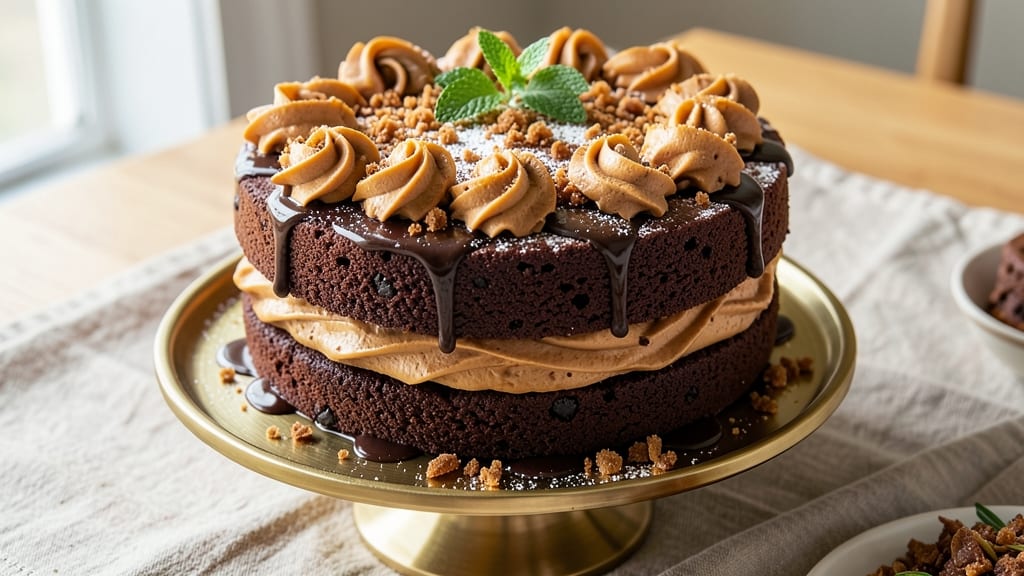
This butterscotch chocolate cake recipe delivers the perfect marriage of rich cocoa and caramelized sweetness—think velvety layers with fudgy cracks and swirls of butterscotch that melt into every bite. 🍫 The secret lies in a two-tone batter technique: one half deep chocolate, the other infused with butterscotch extract, creating striking layers when combined.
I’ve baked this for birthdays, holidays, and spontaneous cravings—it never disappoints, even for first-timers.
What makes this cake stand out is the caramelized butterscotch filling between layers, which adds a luxurious depth without overpowering the chocolate. The recipe uses simple ingredients—flour, cocoa, eggs, and butter—but the layering method and gentle baking ensure a moist, tender crumb with just the right amount of fudge-like density.
No special equipment required, just patience for cooling and assembling.
By the time you slice into this cake, you’ll experience three distinct textures: the dense, crackly chocolate base, the airy butterscotch swirls, and the creamy frosting that ties it all together.
The frosting—a blend of buttercream and butterscotch syrup—sticks beautifully to the layers, making every forkful a symphony of flavors. It’s the kind of dessert that feels indulgent but is actually foolproof to execute.
Serve it warm with a scoop of vanilla ice cream for a decadent twist, or let it cool completely for clean slices. The caramelized edges and butterscotch aroma alone will have everyone asking for the recipe. Let’s get baking!
Ingredients for butterscotch chocolate cake
Twelve simple ingredients transform into a decadent cake with butterscotch swirls and fudgy chocolate layers.
| Ingredient | Amount | Notes |
|---|---|---|
| All-Purpose Flour 🌾 | 3 cups | Sifted for even texture |
| Unsalted Butter 🧈 | 2 cups | Room temperature, European-style preferred |
| Granulated Sugar 🍚 | 2 ½ cups | Superfine for smoother batter |
| Dark Chocolate Chips 🍫 | 1 ½ cups | 70% cocoa, semi-sweet |
| Butterscotch Extract 🍯 | 1 ½ tbsp | Pure, not imitation |
| Large Eggs 🥚 | 6 whole | Room temperature, separated |
| Baking Powder 🧂 | 1 ½ tsp | Aluminum-free preferred |
| Salt 🧂 | ½ tsp | Fine sea salt |
| Unsweetened Cocoa Powder 🍫 | ¾ cup | Dutch-processed for smoothness |
| Vanilla Extract 🌸 | 1 tbsp | Pure Madagascar preferred |
| Butterscotch Syrup 🍯 | ½ cup | Homemade or high-quality store-bought |
| Heavy Cream 🥛 | 1 ½ cups | Cold for frosting |
| Powdered Sugar 🍚 | 4 cups | Sifted for smooth frosting |
The butter and eggs are non-negotiable for that velvety texture—European-style butter has higher fat content, which translates to richer layers. For the cocoa powder, Dutch-processed is key; it dissolves more smoothly and gives a deeper color. Butterscotch extract is the secret weapon here—look for pure extract (not imitation) at specialty stores like Williams Sonoma or Sur La Table. If you can't find it, butterscotch chips (melted) work in a pinch, though the flavor won't be as concentrated. The flour should be sifted before measuring to avoid dense layers, and superfine sugar ensures a silky batter, though regular granulated sugar works if you pulse it in a food processor.
No butterscotch extract? Melt 1 cup of butterscotch chips and strain out the solids for a DIY version—just remember it won’t be as potent. Swapping dark chocolate chips for milk chocolate will make the cake sweeter but less complex. For a gluten-free adaptation, King Arthur gluten-free flour blend works well, though the texture will differ slightly. The vanilla extract can be omitted if you’re using vanilla bean paste, but pure extract is more reliable for consistent flavor. If you’re short on heavy cream for the frosting, whipped coconut cream (chilled overnight) mimics the texture beautifully—just reduce the powdered sugar slightly since coconut cream is sweeter.
This cake keeps remarkably well—wrapped tightly at room temperature for 3 days or frosted and refrigerated for up to 5 days. For longer storage, freeze the unfrosted layers (separated by parchment) for up to 3 months; thaw overnight in the fridge before assembling. The frosting can be made a day ahead and stored in the fridge—just re-whip briefly before using. To serve, slice with a warm knife for clean cuts, and garnish with extra butterscotch chips for a restaurant-worthy finish. The cake actually improves overnight as the flavors meld, so bake it the day before if you can—trust me on this.
Why You'll Love This Recipe
- One-Bowl Wonder: I swear by this—no mixing bowls, no stress. Just cream butter and sugar, toss in the dry stuff, fold in chocolate chips, and bake. My hands stay clean, my counters stay clear, and somehow it still tastes like I slaved over it.
- Caramel-Kissed Magic: That butterscotch extract? It’s the secret weapon—warm, buttery, and just sweet enough to make the dark chocolate sing. Honestly, it’s the kind of flavor combo that makes me want to eat cake for breakfast (and I do).
- Party or Pajamas: Slice it for a dinner party (it’s fancy enough) or grab a fork at 9 PM when you’re craving something rich. Between us, I’ve fed a crowd with this and sent leftovers home with guests—every time.
- Budget-Friendly Luxury: You’re using pantry staples here: flour, butter, sugar. The chocolate chips and extract add that special touch without breaking the bank. Plus, it keeps for days—so you’re not scrambling to use it all up.
Step-by-step instructions for butterscotch chocolate cake
Here's how to create a decadent butterscotch-chocolate masterpiece with perfect fudgy texture and caramelized swirls.
👨🍳 Step 1: Prepare the Cake Batter Foundation
Preheat your oven to 350°F and grease two 9-inch round cake pans with nonstick spray, then line the bottoms with parchment paper. In a large mixing bowl, cream together the 2 cups unsalted butter and 2.5 cups granulated sugar on medium speed until light and fluffy—about 3-4 minutes. The mixture should nearly double in volume and turn pale.
Add the 6 whole large eggs one at a time, mixing well after each addition until fully incorporated. Scrape down the sides of the bowl as needed to ensure even mixing. Here's the thing—room temperature eggs blend more smoothly, so if yours are cold, let them sit at room temperature for 30 minutes before using.
👨🍳 Step 2: Fold in Dry Ingredients and Chocolate
In a separate bowl, sift together the 3 cups all-purpose flour, 1.5 tsp baking powder, 0.5 tsp salt, and 0.75 cup unsweetened cocoa powder. With the mixer on low speed, gradually add the dry ingredients to the butter mixture, alternating with 0.5 cup butterscotch syrup and 1.5 tbsp butterscotch extract.
Once combined, fold in the 1.5 cups dark chocolate chips by hand using a silicone spatula. Be gentle here—overmixing develops gluten and can make the cake dense. The batter should be thick but pourable. Divide the batter evenly between the prepared cake pans, spreading it out smoothly.
🔥 Step 3: Bake Until Golden and Set
Bake the cakes for 25-30 minutes, or until a toothpick inserted into the center comes out with a few moist crumbs but no wet batter. The edges should be set, but the tops may still look slightly underdone—they'll firm up as they cool. Rotate the pans halfway through baking for even cooking.
I like to tap the sides of the pans gently after 20 minutes—if the cake springs back slowly, it's ready. If it bounces back quickly, give it another 5 minutes. Let the cakes cool in the pans for 10 minutes before transferring to a wire rack to cool completely.
🍳 Step 4: Prepare the Butterscotch Cream Filling
While the cakes cool, whip the 1.5 cups heavy cream in a chilled bowl until it forms soft peaks. In a separate bowl, sift together the 4 cups powdered sugar and gradually fold it into the whipped cream along with the 1 tbsp vanilla extract and an additional 1 tbsp butterscotch extract for extra depth of flavor.
The filling should be thick but spreadable. If it's too stiff, add 1-2 tablespoons cold water to loosen it slightly. This step is where the butterscotch flavor really shines—don't skimp on the extract. The filling should have a smooth, velvety consistency with a hint of caramelized sweetness.
🥘 Step 5: Assemble and Frost the Cake
Once the cakes are completely cool, level the tops if needed using a serrated knife. Place one cake layer on a serving plate and spread an even layer of the butterscotch cream filling over the top. Replace with the second cake layer and press down gently. Spread the remaining filling over the top and sides of the cake, creating a smooth, even surface.
For extra indulgence, melt ½ cup dark chocolate chips with 1 tbsp butter and drizzle over the top, allowing it to create decorative streaks. Chill the cake in the refrigerator for 30 minutes before slicing to let the filling set. Each slice should reveal rich chocolate layers, caramelized swirls, and that perfect fudgy texture we're after.
Pro Tips For Making Butterscotch Chocolate Cake
- MELT THE CHOCOLATE RIGHT: Use a double boiler or microwave in 20-second bursts—stirring between each—until smooth. I learned this the hard way: lumps in melted chocolate ruin the whole texture, and you’ll taste every single one.
- WEIGH YOUR FLOUR: Spoon it into the cup, then level with a knife. Dumping flour straight from the bag packs it too tightly, and your cake will turn out dense. I know, it’s tedious, but it’s the thing that matters most for a light crumb.
- DON’T OVERMIX THE BATTER: Stop as soon as the flour disappears. Overworking it develops gluten, and your cake will end up tough instead of tender. Two minutes max—yes, even if it looks lumpy.
- BAKE UNTIL THE CENTER HITS 205°F: A toothpick might come out clean, but the internal temp is foolproof. I used to pull cakes too soon, and they’d stay gummy. Let it ride—your future self will thank you.
Common mistakes when making your butterscotch chocolate cake
Overmixing the Batter
I’ve seen this happen more times than I can count—overmixing the batter turns your cake into a dense, chewy brick instead of the light, fudgy layers you want. The moment the batter starts to look smooth and homogeneous, stop mixing.
Once you’ve incorporated all the dry ingredients, fold in the chocolate chips by hand with a silicone spatula. Overmixing develops gluten in the flour, which creates a tough texture. 💫
Skipping Room Temperature Ingredients
Cold butter and eggs are the sneakiest culprits for a failed cake. Butter should be soft but not melted (press your finger into it—it should leave a slight indent), and eggs should be at room temperature. Cold ingredients don’t blend smoothly, leading to pockets of unmixed batter and uneven texture.
Let your butter sit out for 1-2 hours and eggs for 30 minutes before starting. Trust me, this small step makes all the difference.
Incorrect Baking Time
Underbaking leaves your cake gummy, while overbaking dries it out. The key is testing with a toothpick at 25-30 minutes—it should come out with moist crumbs, not wet batter or completely clean.
I’ve learned the hard way that cakes finish baking as they cool, so resist the urge to overbake just because the top looks underdone. If in doubt, err on the side of slightly underbaked—you can always put it back in for a few minutes.
Uneven Filling Distribution
The butterscotch cream filling is where the magic happens, but uneven distribution ruins the effect. Spread the filling evenly between layers—no thick globs in the center. Use a bench scraper to smooth the sides and top for a professional finish.
If the filling is too runny, chill it for 10 minutes before assembling. A lopsided cake isn’t just unsightly; it affects the texture of every slice.
Rushing the Cooling Process
This is a big one—I’ve seen people slice into cakes straight out of the oven, only to end up with a messy, crumbly disaster. Let the cakes cool in their pans for 10 minutes, then transfer to a wire rack to cool completely (at least 1-2 hours).
The filling needs time to set, and warm layers won’t hold up properly. Patience here ensures clean slices and a stable structure. ⏰
Ignoring the Butterscotch Flavor
Butterscotch extract is the soul of this cake, and cutting corners here is a mistake. If you use imitation extract or skip it entirely, your cake will taste like plain chocolate.
For extra depth, add a splash of butterscotch syrup to the frosting or drizzle melted butterscotch chips over the top. The aroma alone will make your cake irresistible—don’t skimp on the flavor! 🍯
Nutrition facts
Frequently asked questions
Can I make this cake without butterscotch extract?
Yes! Melt 1 cup of butterscotch chips and strain out the solids for a DIY version. For even more flavor, simmer ½ cup brown sugar with ¼ cup heavy cream until caramelized, then cool before using. Just note the flavor won't be as concentrated as pure extract.
How do I prevent the cake from cracking?
Cracking happens when the cake cools too quickly. Let it cool in the pan for 10 minutes before transferring to a wire rack. Also, avoid opening the oven door too soon—rapid temperature changes create stress cracks. If cracks appear, cover them with extra frosting for a seamless finish.
Can I use this recipe for cupcakes instead?
Divide the batter into 24 cupcake liners (fill ⅔ full) and bake at 350°F for 18-22 minutes. For a butterscotch twist, pipe a swirl of butterscotch cream into each cupcake before adding the frosting. Use a toothpick to create a marbled effect in the batter for visual appeal.
Why does my cake taste more chocolatey than butterscotch?
The butterscotch flavor needs time to develop. Let the cake sit at room temperature for 1 hour before slicing to allow the extract to mellow. For extra depth, brush warm cake layers with a butterscotch syrup glaze before frosting. The combination of heat and syrup enhances the caramel notes.
Can I make this cake gluten-free?
Yes, but expect a slightly denser texture. Replace the 3 cups all-purpose flour with a 1:1 gluten-free baking flour blend (like King Arthur). Add ½ tsp xanthan gum if your blend doesn't include it. For moisture, reduce the sugar by ¼ cup and increase the butterscotch syrup to ⅔ cup to compensate for the dryness.